Saturday, February 19, 2011

Photographing Guns...Part 2

In Part 1 I showed how I took some of the photo's that people have asked me about.  Tonight I took a few minutes to setup and take a photo using an economical lighting setup.  The economical lighting is just a 100W light and some white fabric to diffuse the light.  I used my Alien Bee strobe's modeling light (just a 100w incandescent bulb) and a white diffuser.  The reason for the nylon fabric is to soften the light.  The white nylon fabric is also useful if you are taking photo's outdoors to soften the harsh sunlight.

In this photo you can see there is not much to the setup, just a light, the diffuser fabric, bins, towel and the gun.  You could also use more light's if your camera doesn't do well at high ISO's.  I think i shot these at 3200iso, you can also use a tripod and a slower shutter speed to get the correct exposure if your camera doesn't handle high ISO's


Below is a photo using the simple setup.  Nothing fancy, but it's a lot better than trying to use an on-camera flash.


Another little secret is how I get the gun to stand up without putting something through the trigger guard.  Just a small 25 cent spring clip from the hardware store and clip it onto the safety or just lean the gun on it.


Well that's it for now.  Later i'll do an economical setup with multiple lights.

Friday, February 11, 2011

Photographing Guns...Part 1

Yet another topic I get asked about.  I'm not a professional photographer, but have done freelance work in the past.  With that out of the way, let's get to it.

Here's the equipment that i typically use:
Nikon D300
Nikkor 17-55mm/f2.8
Alien Bee's lights (B800 and B400's)
24"x 36" Softbox or Beauty Dish
Grid's (narrow the side light beams)
Pocket Wizards (used to trigger lights)
Gels (these are used for color)
light stands
background material
Sekonic L-358 light meter

Depending on the look you want, you can get by with 1 light.  You don't neccissarily need expensive lights, I've taken photo's in the past using shop lights and white nylon rip-stop fabric from a fabric store.  This photo was taken with a single light (B800) directly above the gun.  A little secret is that if you look at the rivets on the case or at the slide stop, you can usually see how many lights are used.  I usually shoot the photo's at f11-f13 (apeture), 200iso and 1/250" (shutter speed) , which is what my light meter displays.


For multi-colored light setup's, I still use the single light above, but now I add lights to the side.  I prefer to use grids, so that the light from the side is narrower, which also allows me to focus where the beam is going.  I have a 10* and a 20* grid, but would recommend 10* grids, which I need to buy another.  My lights have can be turned on so that I can adjust where the light is going to end up, which makes it a little easier to position.  Gels are used to add color to the photo.  In the photo's below I chose red and blue, which give it a feel of lights on a Police car.

Here is a photo of the setup.  It looks like I'm in a complete dark room, but it was actually a cloudy day out and when using lights (strobes), you can over-power the sun.


Here's a photo from the setup shown above


Now the last little tip that i have is how to get the light from the weapon light to appear in the photo.  It's fairly simple when using lights (strobes), just change the shutter speed.  I dropped the shutter speed from 1/250" down to 2" or 3".


Here's a link that is helpful for doing "product" photography.

Replacing sights on a Springfield "fixed" rear sights with 10-8 sights.

Common question that I get asked is "How did you get the 10-8 sight to fit?" or "The 10-8 sight is too large for the Springfield dovetail."  The 10-8 sight is a standard "Novak" cut sight, though Springfield's rear dovetail is about .015" small than the standard "Novak" cut.  So in order to get the new sight to fit, some filing needs to be done on the new sight.

I usually use a triangle file to do the filing, that way i can file all the way up to the tight corner of the sight.  When you are filing remember that it's easier to take more metal off than it is to put metal on.  Also remember it's better to make an error on the less expensive part, which is why the sight is filed and not the cut-out on the slide.  When you are filing you want to maintain the same angle of the sight.

In this photo you can see where the rear sights were filed from the factory.  You can also see that on the sight on the left there is some remaining Loctite that the factory used.  The sight on the left is from my EMP and the sight on the right is from my TRP.


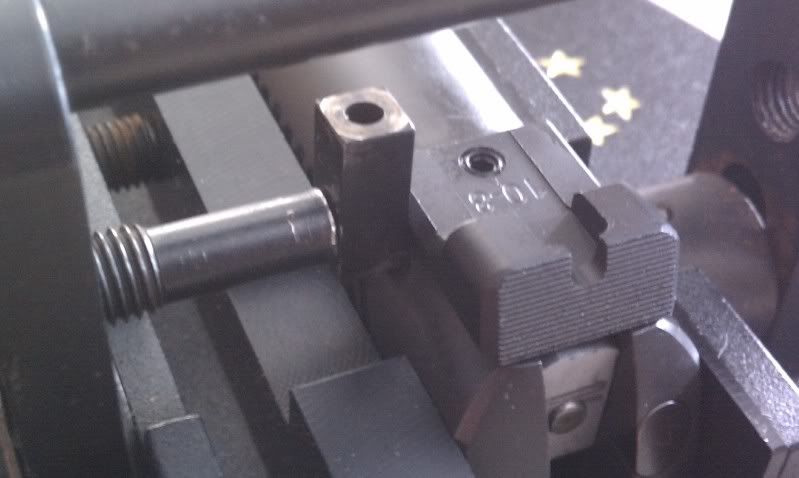
I file just enough so that the sight can start onto the dovetail about 1/3 of the way on, then i finish with a sight pusher.  I've been using a B&J Machine P500 sight pusher for about 10 years now.  One thing that I'm doing differently with it is I use the square pin in-between the round pin when installing sights.  The reason is that the tips are worn and turn with the screw which could leave a mark on the new sight.  


I use a B&J Machine P500 sight tool that you can get from Brownell's

I use a caliper to see that the sight is centered on the slide, which hasn't failed me yet.  Once centered, I'll place a drop of blue Loctite on the set screw to keep it from loosening up.  This is just an extra precaution even though I like to fit the sight really tight to the slide.

Here's what the final product looks like: